Newsletter via Listmonk
For reasons of long-term support and because the requirements for newsletter services are constantly evolving, we recommend that our members switch to Listmonk, our new newsletter service. The website of listmonk.app offers extensive descriptions and tutorials on how to create and send newsletters with Listmonk. To make it easier to get started, we have summarized the most important steps for setting up the service here.
How do I get access to Listmonk?
If you would like to send newsletters via Listmonk and are a member of servus, simply send us an email to office@servus.at and let us know the desired name of your newsletter or website and the desired subdomain of your newsletter (e.g. newsletter.meinedomain.at) and the email address you would like to use to send the newsletter. Our technicians will then set up the newsletter server and send you your access data.
Mail server settings
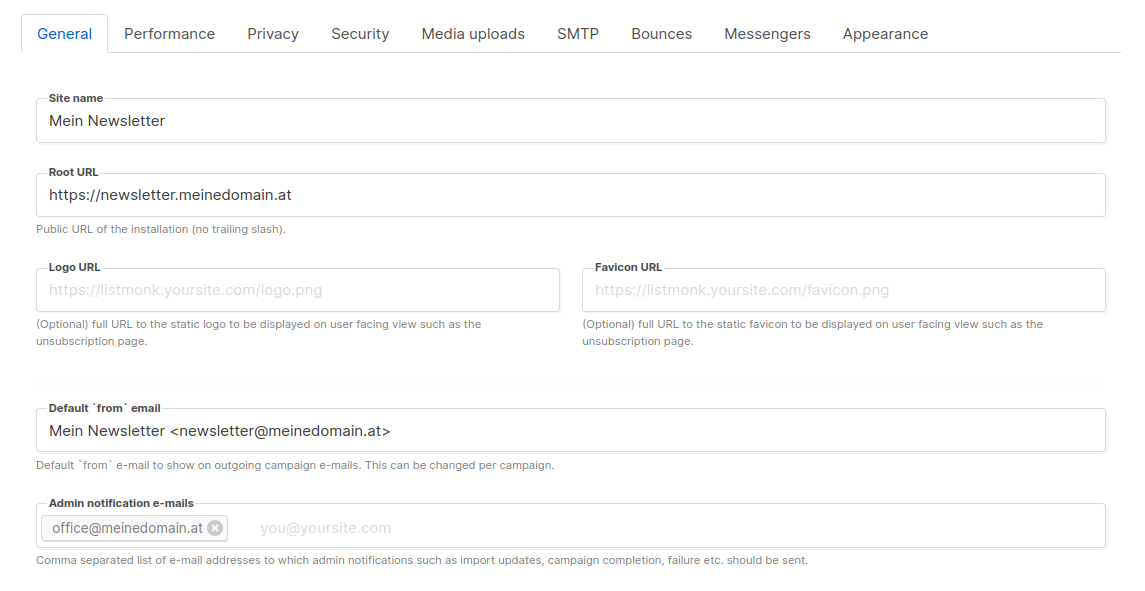
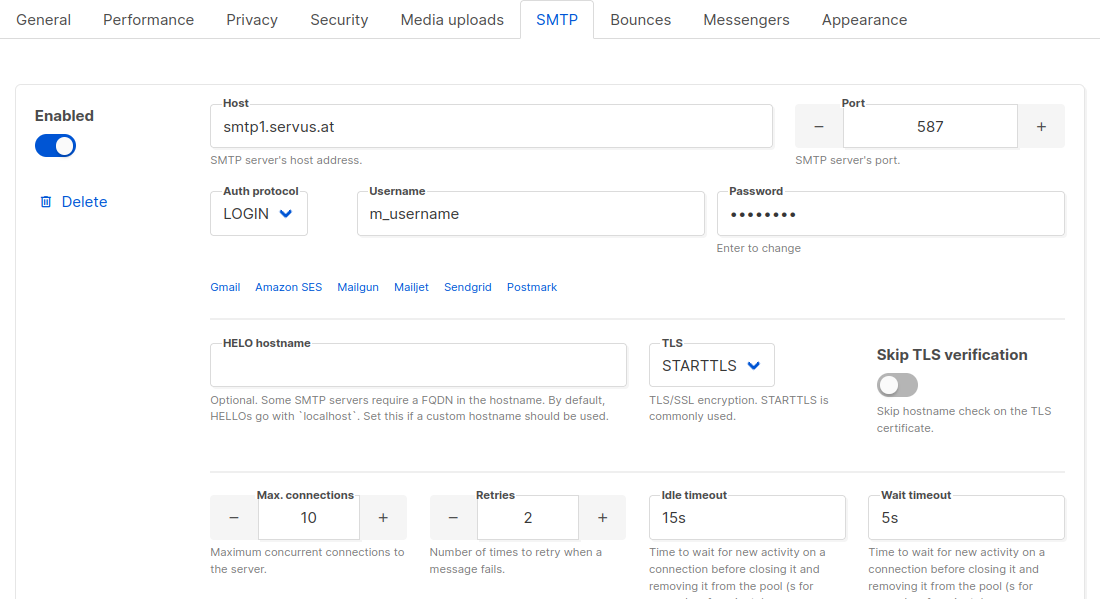
To be able to send your newsletter, you first need to make a few settings. On the one hand, general settings such as the URL of your newsletter page, which email address should be used, etc. On the other hand, you also need to configure the mail server (SMTP). It is particularly important that you configure the host, port, auth protocol, username, password and TLS correctly under SMTP settings. The screenshot shows examples of what these settings could look like.
Create and manage lists
Lists contain a collection of subscribers to whom you can send your newsletter. You can create multiple lists if you need to. You can find an overview of your lists in the menu bar on the left. You can create a new list at the top right by clicking the “+ New” button.
Lists are divided into public and private. Public lists are those where subscribers can subscribe independently, for example via a registration form on your website, while private lists can only be viewed by you. Furthermore, lists can be configured as “single opt-in” or “double opt-in”. We always recommend choosing double opt-in here, as subscribers are asked to confirm their registration again by email. This helps to reduce unwanted subscriptions to your newsletter (e.g. bots)
Note: It is advisable to name the main list used as “Newsletter”, for example. This is because the name of the list appears in the registration form and a clear name can prevent confusion among users.
Registration form
You can easily call up and integrate a registration form for your newsletter via newsletter.yoursite.at/subscription/form. Users can subscribe to your newsletter here and enter the respective list. Only lists that are set to “public” will appear here. In the side menu under “Lists–>Form” you can select the lists that should appear in the subscription form, and you can also copy the URL to the subscription form here.
Add and create subscribers
Once you have created a list, you can now add subscribers. You can either do this individually, but also collectively using .csv files (e.g. if you want to move your subscribers from another newsletter tool.
Create single subscribers
To create new subscribers, first click on “Subscribers –> All Subscribers” in the menu bar on the left. Here you will see an overview of all your subscribers. Click on the “+ New” button at the top right to create a new subscription. The fields Email, Name and List must be filled in, the rest is optional. If you select an opt-in list, you can select the “Preconfirm Opt-In” option to avoid sending a confirmation email and immediately activate the entry as confirmed.
Abonnent:innen als Liste importieren
The best way to add many subscribers at once is to use the “Import” function, which you can also find under “Subscribers” in the menu bar on the left. This can be particularly useful if you are moving from another newsletter to Listmonk, for example. The import function requires the collection of subscribers in a list, which is saved as a .csv file. Any newsletter tool can export such a .csv file. You can find out how this works in the documentation of your previous newsletter or via search engines on the Internet.
You can make some settings in the import window, but the default settings are normally suitable. If “Overwrite” is activated, existing users are overwritten, i.e. name, attributes and status. However, the assigned lists are not overwritten, only added to new lists.
Below you will find the field where you can drag and drop the .csv file. Once you have set everything up, you can import your subscribers by clicking on the “Upload” button
Create and send a newsletter
Listmonk refers to newsletters and all other types of email mailings as campaigns. To create such a campaign, click on “Campaigns” in the side menu on the left and then on “Create New”. Here you can enter a name, a subject and the sending email address. Then define the list(s) to which you want to send your campaign and the email template on which you want to base your newsletter. (You can find out how to create or edit a template here)
Then click on continue and you can edit your email. Listmonk offers a normal text editor as well as RAW HTML, Markdown and plain text editors. At the top right, under “Preview”, you will find the button with which you can view a preview of your newsletter at any time. Drafts can also be saved and edited later.
To send a test mail, click again on “Campaigns –> All Campaigns” and select the desired campaign. In the window that appears (the same window where you can make the basic settings) you will find the “Send Test Message” field on the right. Enter the desired recipient address here and click “send”. (Note: The specified address must be set up as a subscriber.)
Sending a campaign
As soon as the email is finished, you can start sending it. To do this, click on “Start Campaign” in the campaign editor or on the rocket symbol in the campaign overview. Listmonk will now start sending your newsletter. Depending on the number of subscribers in the selected list, this may take some time. You can track the progress in the campaign overview.
In the campaign overview, you will also find a small symbol for each campaign that represents a bar chart. Under this button you will find statistics about your newsletter. Here you can see how many people open your newsletter and click on links in it. You can also see the number of bounces (failed delivery attempts) here.
Bounces
Under “Settings –> Bounces” you can set how Listmonk should handle bounces and the affected users. Bounces are basically feedback from the mail server when a message cannot be delivered. A distinction is made between “soft bounces” and “hard bounces”. Soft bounces are temporary delivery problems (e.g. full mailbox), hard bounces are permanent (e.g. non-existent mail address).
The settings specified by Listmonk are generally recommended, as soft bounces can be delivered again in the future, but hard bounces are highly unlikely to work again in the future and should therefore either be blocked within the list or even removed completely to avoid constant error messages. The bounce count defines when the selected action is executed.
If the bounce messages are not to be retransmitted to the sender address, this can be specified under “Settings -> SMTP -> Custom headers box” with the following line of code. Replace “your-bounce-inbox@site.com” (within the quotation marks) with the desired mail address.
[
    {"Return-Path": "your-bounce-inbox@site.com"}
]
Create and edit templates
By default, Listmonk offers a template for sending newsletters. This “Default campaign template” can also be duplicated and edited under “Campaigns –> Templates”. However, creating a new template or editing an existing one must be done using HTML, for which a basic knowledge of HTML is an advantage. HTML is a kind of programming language that contains certain parameters and converts them into formatted text. Here is an example of how the word “red” can be displayed in this color using html:
that’s <span style=”color:#FF0000″>red</span>! → that’s red!
To make it easier for people who have little or no experience with HTML to work with HTML, we summarize the most important parameters for the templates here.
Basically, a template consists of a header, body and footer. You can define your own default settings and styles in all these areas, you have free choice here. In the body template, however, the expression {{ template “content” . }} should appear exactly once in the body template, at the place where the body text would otherwise appear. Listmonk then inserts the text that you finally enter when creating the campaign at this point. Listmonk also automatically adopts settings defined when creating the campaign, such as color, listings, etc.
To change the basic design of the template, open the desired template and search for the <head> tag in the HTML file. Within this head tag there is the <style> tag. This style tag contains standard parameters such as color, font size, font, etc. The style tag in turn contains various default settings for different areas of the newsletter, such as body (body text of the newsletter), footer (footer), buttons, etc. For example, a tag for color changes can appear several times in the style tag, depending on the area for which the color is to be changed, so different colors can be set for the background as well as for any buttons.
Settings in the <head> tag are basically default settings that are applied in the template. However, if the tag (this tag contains the actual content of the newsletter) also contains settings for changing certain parameters (such as colors), these are prioritized and the settings in the head tag are not applied. Here is a brief overview of a few areas that exist in the default template.
body { }
Body specifies how the newsletter should look in general, i.e. background color, font size, font, etc.
.button { }
Defines the design of buttons that can be inserted into the newsletter.
.footer { }
Includes footer formatting options such as text alignment, color and font size
img { }
Specifies the size in which images should be inserted. For example, “max-width: 100%; height: auto;” indicates that an image should cover the entire width of the newsletter and the height should retain the aspect ratio of the image.
Various attributes can be customized within these areas. However, these only apply to the respective area and not across others. A specific color, for example, must therefore be defined in each relevant block. The most important parameters and how to understand them are listed here.
Color
Colors are usually defined with “color” or “background-color”, depending on whether they are font colors, backgrounds, etc.. These colors are specified in HEX codes. The hexadecimal code is used to define color values in the RGB color space. You can recognize these HEX codes by the fact that they always begin with a hash sign #. Black, for example, has the HEX code #000000, red #FF0000. There are a number of “coulour pickers” online that can be used to select colors and display the corresponding codes.
Font
Font size is always described with “font-size” and given in pixel values. A typical font size is e.g. “font-size: 15px”, which corresponds to 12pt in conventional text editing programs.
Line spacing is specified with “line-height”, also in pixel values. “line-height: 26px” goes well with “font-size:15px”. It is important to adjust this parameter to the font size, as the line spacing is not changed automatically. A font that is too large would therefore overlap instead of adapting correctly.
The font is defined with “font-family”, where the desired fonts are specified, such as Helvetica or Segoe UI. Multiple fonts can also be specified to define the displayed font for different operating systems. As an example, we can see the following definition: font-family: ‘Helvetica Neue’, ‘Segoe UI’, sans-serif;
This is to be interpreted as meaning that the “Helvetica Neue” font should always be used. For operating systems that do not have this font, “Segoe UI” is tried next. If this is also not available, the default sans-serif font should be used.
Listmonk also offers the option of using so-called “template expressions/functions”. These are short snippets of code that fulfill a specific function. These expressions, which can be used in the template body as well as the header and footer, are always specified with two curved brackets {{Template Expression}}. Examples are:{{ .Subscriber.Name }} = Name of the subscriber{{ .Campaign.Name }} = Internally assigned name of the campaign{{ UnsubscribeURL }} = Creates and embeds the URL via which subscribers can unsubscribe from the newsletter (ideal for footers){{ Date "2006-01-01" }} = Specifies the current date in the format defined here
Listmonk offers many more of these expressions. Here you will find a complete list of all possible template expressions.