Basic settings for sending newsletters using Mailtrain
List settings
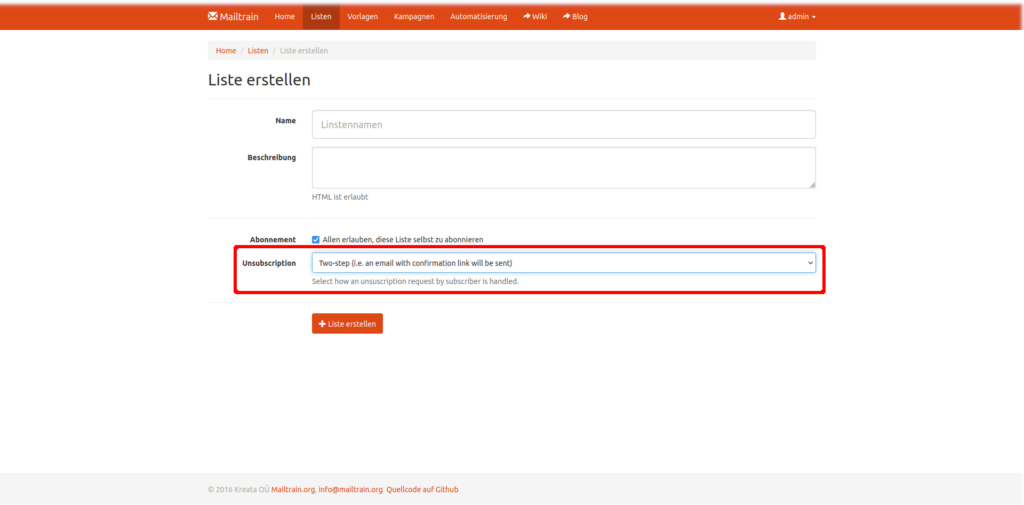
In principle, lists can be created without any problems, but there is one setting that should be taken into account. This setting relates to the link to unsubscribe from a newsletter, which must always appear in the email. With some mail providers, it can happen that they trigger the unsubscribe automatically. To prevent this, the option “Two-Step” must be selected under “Unsubscription” in the respective lists. (see screenshot) If a subscriber now clicks on the unsubscribe link, they will be redirected in the browser and asked to confirm the unsubscription again.

Here we show you which basic settings you have to set for sending mails and we give you a short overview of the most important additional functions.
To tell Mailtrain how to send out e-mails you need to provide basic information about your mailserver. All information you need to provide should be in your hands already, if you ordered a Mailtrain instance from .
If you would like to change the user email address and/or password please do so here: https://newsletter.domain.at/users/account (where newsletter.domain.at should be replaced with the actual domain under which your Mailtrain was set up).
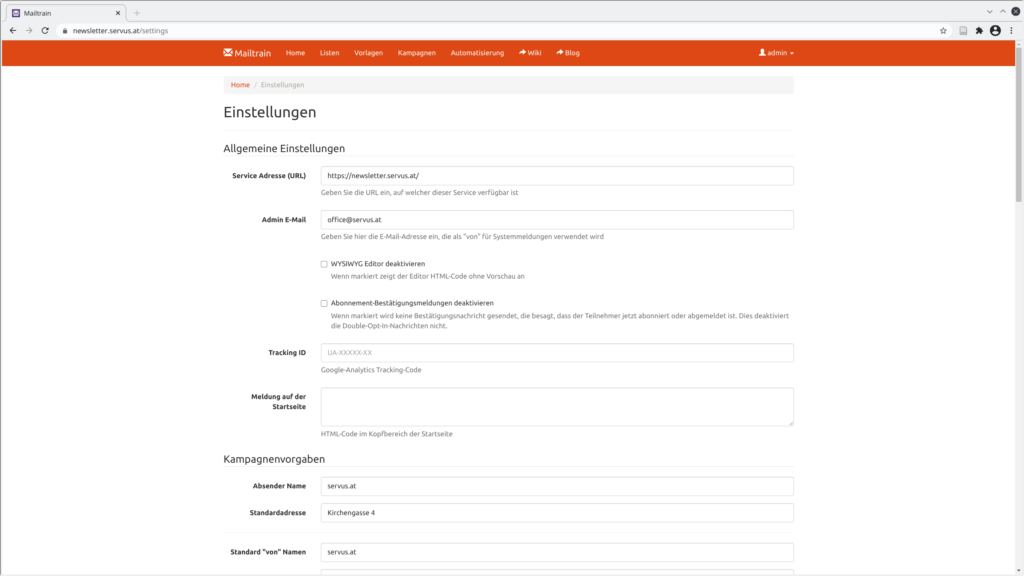
Please also make sure to update Allgemeine Einstellungen, Kampagnenvorgaben and Mailer-Einstellungen with the correct information here: https://newsletter.domain.at/settings

Section “Allgemeine Einstellungen”
- Set
Service Adresse (URL)to the URL your instance is running at, for examplenewsletter.domain.at
It is the same URL that you are on while configuring Mailtrain. Check out your browsers URL bar. - Provide an
Admin E-Mailaddress, that is the same as theStandard "von" E-Mail-Adresse(see below).
Section “Kampagnenvorgaben”
Please add a Standard "von" E-Mail-Adresse – the e-mail address that should be the sender of the e-mail (can be changed later on each campaign)
The following are optional:
Absender Name– your name or that of your organizationStandardadresse– your addressStandard "von" Namen– the name that should appear in the e-mail as the sender (can be changed later for each campaign)Standard "Betreffzeile"– the subject line that should be in the e-mail (can be changed later on each campaign)Standard-Homepage (URL)– your website URL
Section “Mailer-Einstellungen”
Hostname– smtp1.servus.atPort– 587Verschlüsselung– STARTTLSBenutzername– your e-mail user name for yourStandard "von" E-Mail-Adresseprovided above (usuallym_yourname)Passwort– the password corresponding to your e-mail account
Optionally you can now add your private GPG key. Users with deposited GPG key receive encrypted messages and if you have also set the signing key here, the messages are signed with this key.
If you do not provide a key here, the mails will still be sncrypted, but not signed.
As is already stated: Do not use sensitive keys here. The private key is not encrypted in the database.
That’s it, now you can start creating lists of newsletter subscribers.Listen Einstellungen
Listen können prinzipiell problemlos erstellt werden, allerdings gibt es eine Einstellung die beachtet werden sollte. Diese Einstellung bezieht sich auf den Link zum Abmelden von einem Newsletter der immer in der Mail vorkommen muss. Bei manchen Mailprovidern kann es vorkommen, dass diese die Abmeldung automatisch auslösen. Um dies zu verhindern muss bei den jeweiligen Listen unter “Unsubscription” die Option “Two-Step” ausgewählt werden. (siehe Screenshot) Klickt nun ein Abonnent auf den Abmeldelink so wird er im Browser weitergeleitet und aufgefordert die Abmeldung nochmal zu bestätigen.
