Sharing files and folders
Here you will find everything you need to know about file sharing within Nextcloud. Find out how you can share files both within your organization and with external people and how you can assign permissions for editing or viewing.
Share files and folders
To share files or folders, you must open your cloud in a browser; no shares can be created via the client.
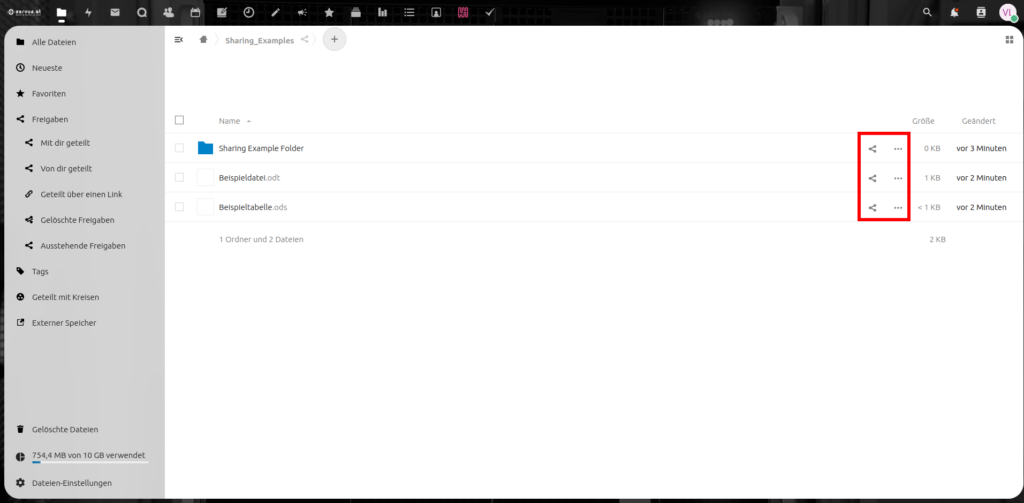
Each file and folder has its own menu to manage the shares. To do this, click on the three dots on the file to be shared (which can be found further to the right of each file) and then on Details and Share or directly on the share icon (three connected dots or initials if the file was shared with you by someone else).
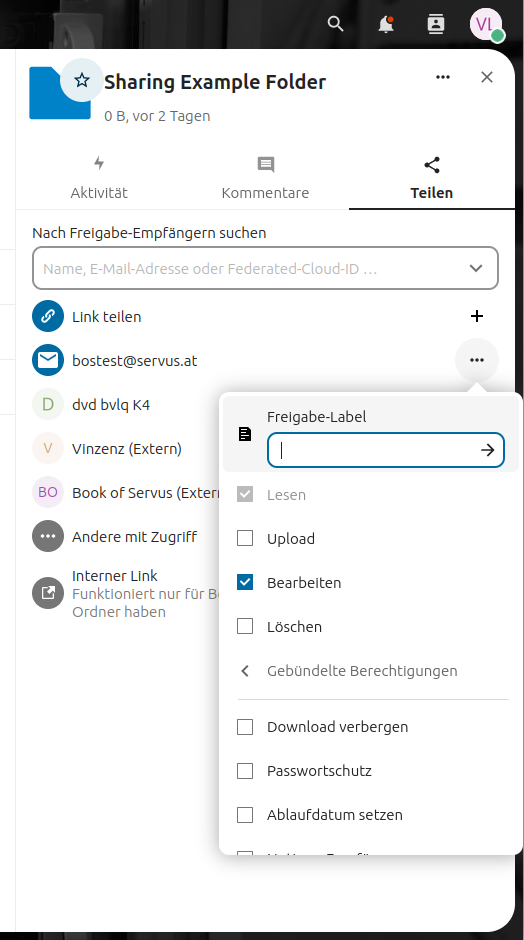
In the “Share” dialog box, you can find people with whom the file or folder is to be shared in the “Search for recipients to share” field. Users can be found as follows: Username (e.g. used for webmail login, ATTENTION: Username must be entered completely and exactly), display name (must be defined in the settings, see here), via e-mail addresses (this also works for people who do not have Nextcloud access) or for several people at the same time via circles (must be created, see here). In addition, a share link can be created, which can be copied and sent via any messenger/mail etc.
As soon as a share has been created, it appears in the share menu with the name of the person, the name of the circle or the email address used. The “Share” icon changes after a share. When sharing by email, it becomes a chain symbol, and the addition “shared” is added within Nextcloud.

If the files have been shared via user or display names or circles, they will appear under “all files” or under “question files/shared with you” for the respective person. If the files were shared via mail, the persons will receive a mail with a link to the file or folder. Clarify. Sharing within a cloud using a username or display name is the simpler and more direct way to share files.
Permissions
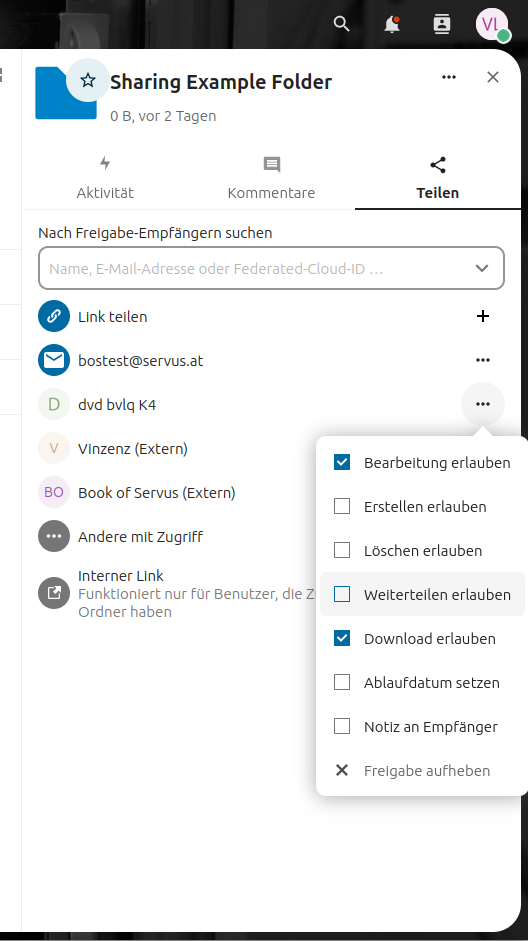
You can define your own authorizations for each share created. This means that you can define who can edit, delete, download, upload etc. files. As soon as a share has been created and appears in the Share menu, you can set the permissions. To do this, click on the three dots next to each share. A drop-down menu appears in which the permissions can be selected individually. In addition to usage authorizations, the shares can also be password-protected or a time limit can be predefined, for example. (Note: Write-protected means that the files can only be viewed and downloaded, but not edited or deleted)
At the bottom of this drop-down menu you will also find the option “Remove share”.
The sharing window for mail shares differs slightly from the others.
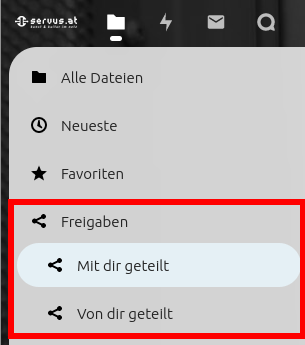
An overview of the shared files can be found on the left in the file menu under “Shared by you”
The share label can be used to add a short title to shares via mail. It can be particularly helpful to sort these using labels if there are many different shares via links.
Add e-mail shares to the cloud
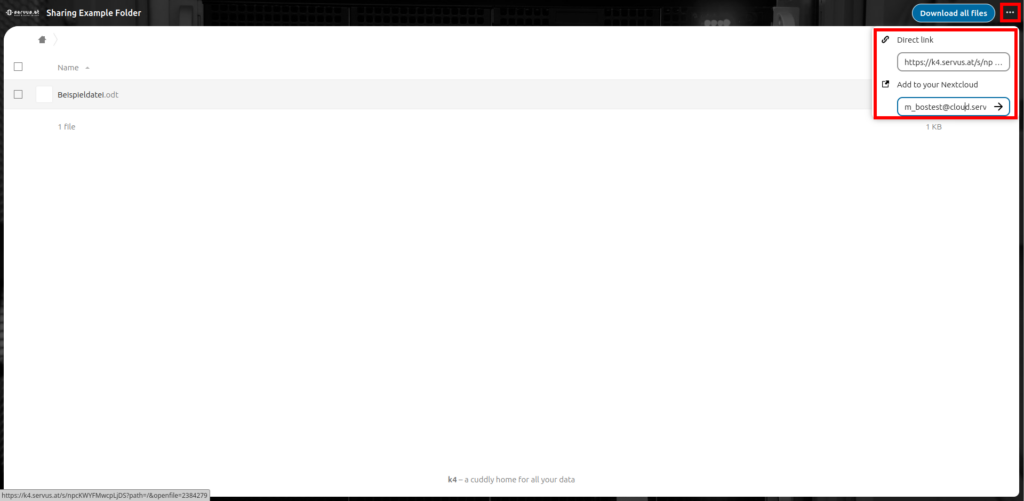
Files that would be shared via email can be accessed in the browser via the link contained in the email. If you want to add this folder/file permanently to your own cloud, you can do this by clicking on the three dots at the top right next to the download button. The link to this folder can be copied here and saved as a bookmark, for example. The folder can also be added directly to your own cloud under the link. To do this, first click on “Add to your nextcloud” and enter “username@cloudinstanz” in the empty field that appears. For example, username (same as for webmail login) “fm_musterpersonm”, cloud instance “cloud.servus.at”. “fm_musterpersonm@cloud.servus.at” must therefore be entered in the empty field. A pop-up window with the message “Remote Share” will then appear the next time you access the cloud. If this message is confirmed, the folder/file appears under “shared with you”.
If all e-mails have been deleted by mistake, a simple e-mail to office@servus.at is sufficient and we will restore your mail account.
By default every user is given 10 GB space. Of course if you really are in need of it on a regular basis, we will gladly raise the limit!
But please note that normally we kindly ask our members to reconsider how critical all the data they would like to keep on cloud is, before asking for an expansion. Also if it’s really necessary for their daily use for collaboration and important data.
As for the time being cloud.servus.at is not intended to be a data-storage solution for large archives, but rather for important documents and collaboration focused content for day-to-day workloads.
Even though we would love to offer unlimited storage to all our members, because of the limitations we have within the data center, it is not a sustainable or a realistic scenario for what we can currently offer.
You can drop an e-mail to office@servus.at and request an increase if necessary.
Sure, you can also communicate encrypted in the cloud webmail. For this you need the browser extension Mailvelope. Mailvelope is available for Firefox, Chrome (also for Vivaldi) and Edge. Besides the key management you have to make sure to add to the preconfigured e-mail providers. To send an encrypted reply, you don’t click on the blue “Reply” button at the very bottom as usual, but there is a transparent button in the middle of the message that triggers a pop-up window to send an encrypted or signed message.
No, we did not enable server-side encryption. And this is for three main reasons:
- It was still in an experimental phase until very recently.
- It requires more server-side processing power.
- It is possible for you to make use of end-to-end encryption using the new versions of the clients.
This way we can make sure that for the average user there is no extra layer of complexity. And in case of a recovery from a disaster scenario, there aren’t additional potential issues.
For users who require encryption because of sensitive information: we are currently testing out the new production ready end-to-end encryption feature. Once it is enabled we will update the documentation on how to set it up.
In the meantime you can use a solution like VeraCrypt in order to encrypt folders and only decrypt them locally on your device while only synchronizing encrypted data.
Yes, you can connect to the cloud service via WebDav in your file browser.
Server: cloud.servus.at
Type: SecureWebDAV(HTTPS)
Folder or path: /remote.php/webdav/

User details:
Username: m_name
Password: The password you use to retrieve your mail.
Or on the other hand you can install desktop clients that automatically synchronize a folder in your file system with Nextcloud. See https://nextcloud.com/install/#install-clients.
Yes. You must provide a folder with the appropriate sharing rights and send the link to the specific person or group. Read more here.
Probably your file is too big. If you are uploading via the web interface files must not be larger than 512 MB. Otherwise you can use the desktop client, which does not have any upload limits. To avoid errors while uploading, we also recommend using the desktop client when dealing with many or large files.
Multiple files are downloaded from the cloud in archive form as .zip (top right download button). Under Mac OSX and Windows (older than Windows 7) it can happen that these .zip files are not recognized correctly and cannot be unpacked. Only additional programs like 7-Zip can help. For OSX there is also keka which uses 7-Zip as a basis.
Docs
Here you will find some useful tips and links that will help you with extending your use of servus cloud. Read more about how to use the desktop client, mobile apps, etc.
Read More